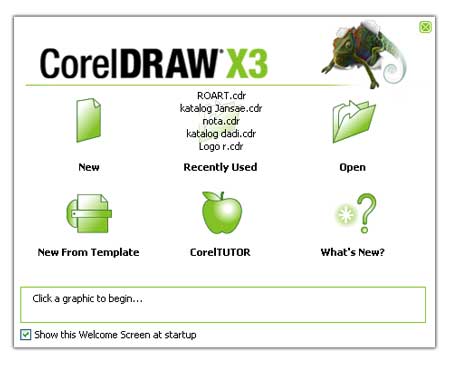
Belajar Corel Draw Dasar Bagian 1 – Corel Draw adalah program ilustrasi grafis berbasis vektor. Dibandingkan program grafis lainnya, program CorelDraw mempunyai keunggulan karena kemudahan dalam pemakaiannya, interface yang user-friendly dan juga kelengkapan fasilitas dan fitur yang bisa digunakan, sangat dianjurkan untuk belajar corel draw dasar ini. Pada Belajar Corel Draw Dasar Bagian 1 ini akan saya bahas tentang Interface (tampilan antar muka) adalah seluruh jendela program yang berisi berbagai fasilitas dan fitur yang ditawarkan program yang bersangkutan dan juga merupakan tempat bagi anda melakukan aktifitas desain. Begitu anda membuka program CorelDraw maka hal pertama yang muncul adalah tampilan Welcome Screen
Belajar Corel Draw Dasar Bagian 1
- New, Pilihan untuk membuat gambar baru (kosong).
- Recently Used, membuka gambar terakhir yang anda buat dan disimpan di CorelDraw.
- Open, Untuk membuka gambar yang telah anda simpan.
- New From Template, membuat gambar dengan menggunakan desain yang telah disediakan.
- CorelTUTOR, membuat gambar dengan mengikuti petunjuk CorelDraw
- What’s New?, untuk melihat fasilitas baru yang ada di CorelDraw dibanding versi sebelumnya.
Interface CorelDraw
Belajar Corel Draw Dasar Bagian 1
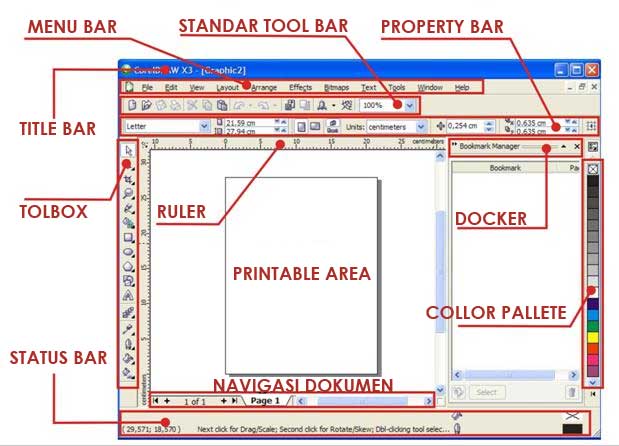
- TITLE BAR, bagian ini berisi keterangan nama file yang sedang aktif dan lokasi penyimpanannya di komputer
- MENU BAR, bagian ini berisi kumpulan menu-menu perintah yang bisa diakses melalui drop down menu berdasarkan kesamaan fungsi dan penggunaannya.
- STANDARD TOOL BAR, bagian ini berisi kumpulan perintah yang paling sering digunakan dalam bentuk ikon untuk memudahkan anda dalam menggunakannya.
- PROPERTY BAR, adalah merupakan bagian yang menampilkan property dari tool atau perintah tertentu yang sedang anda gunakan.
- RULER, merupakan batas-batas vertikal dan horizontal; berisi angka-angka untuk menunjukkan ukuran dan posisi objek. berfungsi untuk membantu anda dalam membuat desain dengan ukuran yang tepat. karena terdapat mistar horizontal dengan satuan ukuran yang dapat anda ubah sewaktu-waktu.
- PRINTABLE AREA, biasa juga disebut kanvas adalah tempat anda membuat ilustrasi. meski anda bisa membuat ilustrasi sebesar apapun tapi yang tercetak adalah objek yang berada didalam objek kanvas saja.
- COLOR PALETTE, bagian ini berisi kumpulan warna-warna yang bisa anda gunakan, secara default CorelDraw menggunakan collor pallet CMYK.
- TOOL BOX, bagian ini berisi kumpulan tool-tool yang dapat anda gunakan untuk membuat dan mengedit objek-objek vektor
- STATUS BAR, adalah merupakan fasilitas yang menunjukan keterangan mengenai atribut objek yang sedang aktif.
- Docker, adalah fasilitas penunjang yang ditawarkan CorelDraw guna membantu anda melakukan pengeditan dan manipulasi objek-objek yang ada dikanvas kerja.
- Navigasi Dokumen, merupakan fasilitas yang menunjukan dokumen yang sedang aktif.
c
orelDraw Dasar Bagian 2 – Apabila kamu berkeinginan mendalami program coreldraw, alangkah baiknya kamu mengetahui apa fungsi tool-tool yang ada di coreldraw. kamu akan lebih paham, lebih mengerti nantinya dan akan lebih mudah untuk melangkah lebih jauh tentang coreldraw. Toolbox di coreldraw biasanya letaknya ada disebelah kanan dan didalamnya apabila diklik masih ada sub bagian dari tool.Pelajari apa saja fungsi-fungsi dari tool-tool yang ada di coreldraw pada pembahasan CorelDraw dasar bagian 2 dibawah ini.
Membuat Garis Lurus
Untuk membuat garis lurus di CorelDraw langkah-langkahnya adalah sebagai berikut:
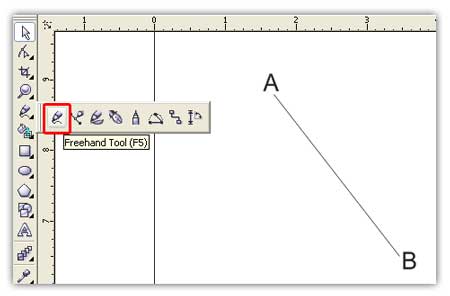
- Klik Freehand Tool di toolbox.
- klik satu kali di titik A pada kanvas untuk memulai pembuatan garis. Klik satu kali lagi di titik B untuk mengakhirinya. Hasilnya berupa sebuah garis lurus.
CorelDraw Dasar Bagian 2, Untuk Pemula
Membuat Garis Bebas
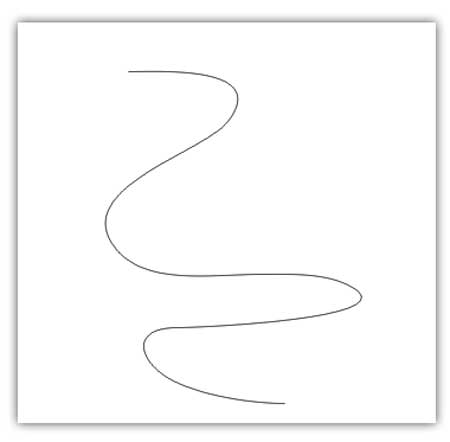
Untuk membuat garis bebas, anda juga bisa melakukannya dengan menggunakan Freehand Tool. Caranya setalah kita klik freehand tool di toolbox, anda cukup menggambar garis bebas tersebut dengan cara klik dan drag pada kanvas
Advertisement
Garis Bebas
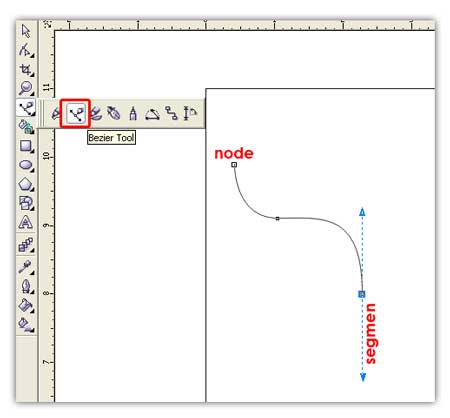
Disamping itu, anda bisa membuat garis lengkung dengan menggunakan Bezier Tool. Caranya sama seperti diatas klik dan drag. Hasilnya anda akan mendapatkan sebuat garis lengkung. Akan terlihat dua buah node(titik-titik penyusun objek) dan segmen (garis putus-putus yang merupakan pengatur node).
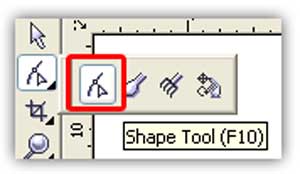
Berikutnya untuk mengedit node tersebut ataupun segmennya digunakan Shapte Tool.
CorelDraw Dasar Bagian 2
Selanjutnya Penggunaan Zoom Tool
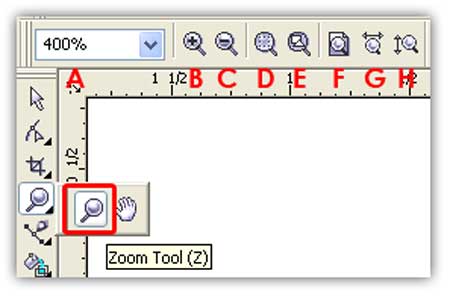
Bila anda hendak mengedit objek yang mempunyai ukuran sangat kecil maka akan sangat dibutuhkan kejelian dan ketelitian yang besar. Di CorelDraw anda sudah disediakan ZoomTool yang dapat memperbesar tampilan pada salah satu bagian yang anda edit. Untuk penggunaannya, setelah anda klik tool tersebut anda bisa memperbesar sebuah tampilan objek dengan cara klik pada bagian objek tersebut ataupun dengan cara klik dan drag. Sedangkan untuk propertinya adalah sebagai berikut. CorelDraw Dasar Bagian 2
- A: Zoom Level
- B : Zoom In (memperbesar)
- C : Zoom Out (memperkecil)
- D : Zoom To Selected (untuk memperbesar objek yang sedang aktif
- E : Zoom To All Object (untuk menampilkan semua objek yang telah kita buat
- F : Zoom To Page (menampilkan seluruh kanvas)
- G : Zoom To Page Width (menampilkan seluruh kanvas secara horizontal)
- H : Zoom To Page Height (menampilkan seluruh kanvas secara vertical)
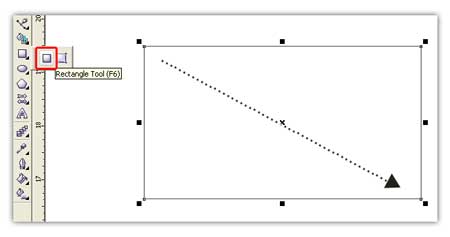
CorelDraw Dasar Bagian 3 – Untuk bagian ini anda masih mempelajari untuk membuat ilustrasi bentuk dasar dengan mneggunakan tool-tool yang laiinya. Yaitu Rectangle Tool, Elipse Tool dan Polygon Tool. Selain itu, dalam CorelDraw penggunaan tombol Shift, Ctrl dan Altsangat penting. Karena dengan tombol-tombol ini anda bisa menciptakan objek yang berbeda dari 1 tool. Rectangle Tool biasa digunakan untuk membuat objek kotak/persegi. Cara penggunaannya cukup dengan klik dan drag pada kanvas hingga menghasilkan sebuah objek berbentuk kotak/persegi. Masih dengan cara yang sama anda bisa mengkombinasikannya dengan menekan Shift, Ctrl dan Alt. CorelDraw Dasar Bagian 3
- klik & Drag + Sift = menciptakan segi empat dimuali dari titik tengah.
- klik & Drag + Ctrl = menciptakan bujur sangkar.
- klik & Drag + Alt = menciptakan segi empat secara bebas
ELIPSE TOOL
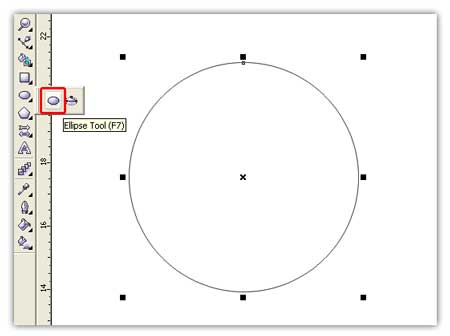
Elipse Tool digunakan untuk membuat objek elips/lingkaran. Dan seperti halnya Rectangle Tool, pemakaian tool ini juga bisa dilakukan dengan mengkombinasikannya dengan menekan tombol Shift, Ctrl dan Alt di keyboard.
Advertisement
- klik & Drag + Sift = menciptakan elips dimuali dari titik tengah.
- klik & Drag + Ctrl = menciptakan lingkaran.
- klik & Drag + Alt = menciptakan lingkaran secara bebas.
POLYGON TOOL
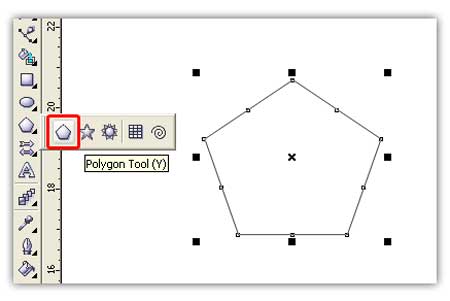
Polygon Tool digunakan untuk membuat objek polgon dengan cara klik dan drag yang juga bisa dikombinasikan dengan menekan tombol Shift, Ctrl dan Alt di keyboard.
- klik & Drag + Sift = menciptakan polygon dimuali dari titik tengah.
- klik & Drag + Ctrl = menciptakan polygon sama sisi.
- klik & Drag + Alt = menciptakan polygon secara bebas.
Untuk mengatur banyaknya sudut dari objek polygon ini yaitu dengan cara mengubah nilai parameter yang ada di property bar. Sedangkan untuk merubah bentuk objek polygon menjadi bintang yaitu dengan cara klik ikon Star pada property bar.
COPY
Untuk melakukan pengkopian dilakukan dengan cara akftif disuatu objek lalu pilih menu Edit>Copy ; Edit>Paste.
CorelDraw Dasar Bagian 3
DUPLICATE
Fasilitas ini pakai untuk melakukan pengcopy-an dengan jarak tertentu. Untuk langkah-langkahnya adalah sebagai berikut
- Terlebih dahulu aktif pada objek yang akan di duplikat.
- Pilih menu Edit>Duplicate, akan muncul sebuah objek duplikat.
- Atur objek duplikat tersebut pada posisi tertentu.
- Pilih menu Edit>Duplicate secara berulang-ulang sehingga kita mendapatkan banyak objek duplikat.
SCALE AND MIRROR
Yaitu suatu jenis transformasi yang membentuk sebuah cermin dari objek gambar. Teknik ini biasa dipakai kalau anda mau menggandakan suatu objek dengan ukuran yang sama. Teknik ini menggabungkan mouse dengan kombinasi tombol Ctrldi keyboard. Untuk caranya dengan meletakan kursor pada salah satu tombol pengontrol, kemudian tarik ke arah yang berlawanan sambil menekan tombol Ctrl di keyboard, dan pada saat yang bersamaan lakukan klik kanan pada mouse.
Outline
OUTLINE
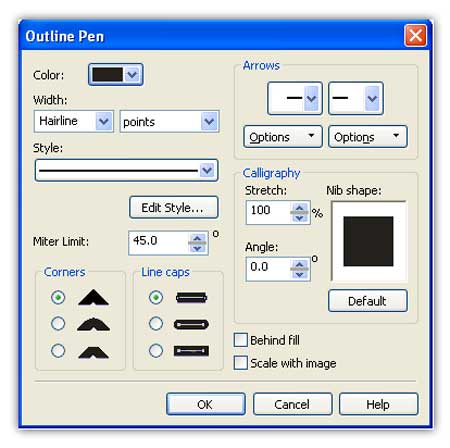
Untuk memproses garis outline pada suatu objek gambar, gunakan Outline Tool. Sebelumnya objek gambar yang akan diproses harus di aktifkan terlebih dahulu. Maka begitu kita klik Outline Tool akan muncul kotak dialog Outline Pen.
CorelDraw Dasar Bagian 4
- Color untuk mengatur warna garis.
- Width untuk mengatur ketebalan garis.
- Style untuk mengatur jenis garis.
- Corner untuk mengatur corner (sudut) dari suatu garis.
- Line Caps untuk mengatur cap dari suatu garis.
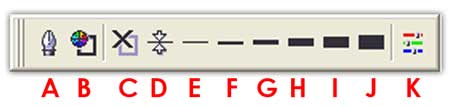
Disamping itu, anda juga dapat mengatu garis melalui subalat dari outline tool. Caranya dengan melakukan klik dan tahan pada ouline tool. Pada waktu prosesnya, system akan menampilkan subalat pada alat tersebut.
Advertisement
- A. Outline Pen Dialog Tool, untuk mengatur outline dalam bentuk kotak dialog.
- B. Outline Color Dialog, untuk mengatur warna outline.
- C. No Outline, untuk tidak memakai outline pada suatu objek gambar.
- D. Hair Outline Tool, untuk memberikan outline dengan ukuran terkecil (0.003 inci).
- E. 1/2 Point Outline Tool, untuk memberikan outline dengan ukuran 1/2 point (0.007 inci).
- F. Medium Thin Outline Tool, untuk memberikan outline dengan ukuran 1 point (0.014inci).
- G. Thin Outline Tool, untuk memberikan outline dengan ukuran 2 point (0.028 inci).
- H. Medium Outline Tool, untuk memberikan outline dengan ukuran 8 point (0.111 inci).
- I. Medium Thick Outline Tool, untuk memberikan outline dengan ukuran 16 point (0.222 inci).
- J. Thick Outline Tool, untuk memberikan outline dengan ukuran 24 point (0.333 inci).
- K. Color Docker Window, untuk memproses pengisian warna pada objek gambar terpilih dalam bentuk docker.
FILL
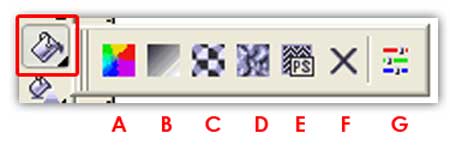
Berfungsi untuk memberikan warna pada suatu objek gambar, dan seperti biasanya Anda harus aktif pada suatu objek yang akan diproses. Untuk jenis-jenisnya sebagai berikut :
- A. Fill Color Dialog, untuk memproses pengisian warna pada objek dalam bentuk kotak dialog.
- B. Fountain Fill Dialog, untuk memberikan isi warna bentuk gradasi pada objek gambar terpilih.
- C. Pattern Fill Dialog, untuk memberikan isi pada objek gambar terpilih dengan gambar bitmap dua warna (Two-Color Fill), berwarna (Full-Color Fill) dan gambar bitmap (Bitmap Fill) lainnya.
- D. Texture Fill Dialog, untuk memberikan isi gambar tekstur pada objek gambar terpilih.
- E. Post Script Fill Dialog, untuk memberikan isi gambar efekprinter post script pada objek gambar terpilih.
- F. No Fill Tool, untuk tidak memberikan isi warna pada objek gambar terpilih.
- G. Color Docker Window, untuk memproses pengisian warna pada objek gambar terpilih dalam bentuk docker.
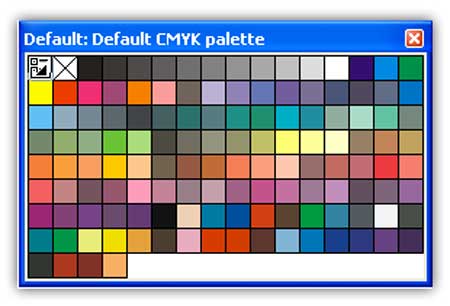
PALLETE COLOR
Berfungsi untuk mengisi suatu objek gambar dengan warna standar dari system warna terpilih. Lokasi standarnya berada pada sisi kanan bagian desktop system. Untuk menampilkannya dengan memilih menu Window – Color Pallete – CMYK.
CorelDraw Dasar Bagian 4
Cara menggunakannya yaitu dengan cara klik kiri (untuk mengisi warna Fill) dan klik kanan untuk mengisi warna outline.
TRANSFORMASI
Trasnformasi suatu objek gambar merupakan kegiatan yang umum dan sering dilakukan pada CorelDraw. Anda dapat melakukan transform bentuk ini secara langsung dengan mouse. melalui mouse, proses transformasi Bisa dilakukan dengan Cepat dan mudah.
SCALE
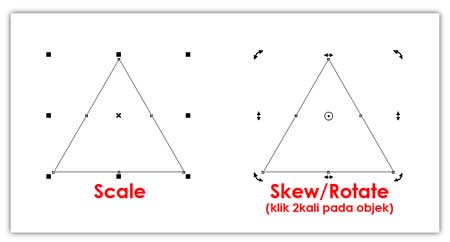
Proses transformasi ini berfungsi untuk mengubah ukuran panjang, lebar ataupun skala objek gambar. disamping itu, proses transformasi ini bisa juga untuk membuat cermin/miror. Sclae sendiri dibagi menjadi scale horizontal, vertical dan diagonal.
HORIZONTAL SCALE
Kegunaanya yaitu untuk merubahlebar suatu objek secara horizontal. Denga cara meletakan kursor pada salah satu tombol pengontrol horizontal, kemudian klik dan drag ke titik tertentu. Hasilnya objek akan berubah ukuran lebarnya.
Advertisement
VERTICAL SCALE
Kegunaannya yaitu untuk mengubah lebar suatu objek secara horizontal. Dengan cara meletakan kursor pada salah satu tombol pengontrol vertical, lalu klik dan drag ke titik tertentu. Hasilnya objek akan berubah ukuran lebarnya.
DIAGONAL SCALE
Berfungsi Untuk merubah ukuran objek secara diagonal. Caranya dengan meletakan kursor pada salah satu tombol pengontrol diagonal. Lalu klik dan drag ke titik tertentu.
SKEW/ROTATE
Transformasi skew Berfungsi untuk mengubah bentuk objek gambar dengan cara menarik sisi atau sudutnya. Proses transformasi ini bisa dikerjakan dengan cara menggunakan pick tool. Ketika anda pertama kali mengaktifkan suatu objek dengan mengklik objek tersebut maka akan muncul tombol pengontrol skala dan jika anda mengklik objek tersebut sekali lagi maka akan muncul tombol-tombol pengontrol untuk merubah ukuran dan bentuk.
CorelDraw Dasar Bagian 5, Untuk Pemula
Untuk melakukan skew horizontal, cara-caranya sebagai berikut:
- Klik dua kali pada objek.
- Letakan kursor pada salah satu tombol skew horizontal.
- Klik jangan dilepas, kemudian drag ke satu titik secara horizontal lalu lepas.
- Hasilnya segitiga tersebut telah berubah bentuknya.
Untuk melakukan skew horizontal, cara-caranya sebagai berikut:
- Klik dua kali pada objek.
- Letakan kursor pada salah satu tombol skew vertikal
- Klik jangan dilepas, kemudian drag ke satu titik lalu lepas.
- Hasilnya segitia tersebut telah berubah bentuknya.
ROTATA/DIAGONAL SKEW
Rotate berfungsi untuk mengubah bentuk objek gambar secara diagonal. cara-caranya sebagai berikut:
- klik dua kali pada objek.
- Letakankursor pada salah satu tombol skew vertikal.
- klik jangan dilepas, kemudian drag ke satu titik dengan arah memutar lalu lepas.
- hasilnya segitiga tersebut telah berubah bentuknya.
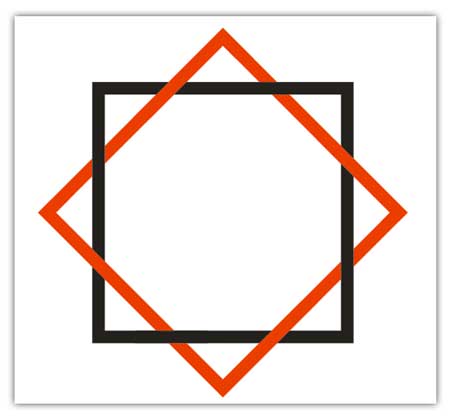
Khusus untuk rotate ini, anda meletakan dimana saja sumbu perputarannya. Dan hasilnyapun akan berbeda-beda setiap kali anda merubah posisi sumbu perputarannya.
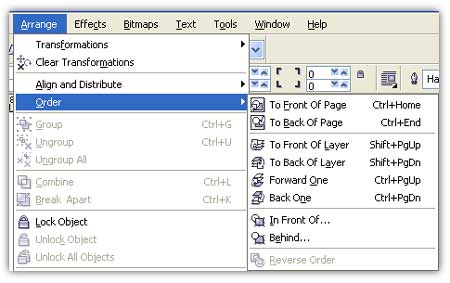
CorelDraw Dasar Bagian 6 – Dalam pembuatan desain anda harus menggunakan dengan banyak objek. Sehingga mau tidak mau anda harus bisa melakukan pengaturan urutan objek (order) untuk memperoleh tampilan yang diinginkan. Dalam hal ini anda mengatur urutan objek secara manual karena urut-urutan objek dibentuk sesuai dengan urutan anda membuatnya. Misalnya objek yang pertama anda buat yaitu berbentuk persegi empat setelah itu anda membuat objek lingkaran, maka urutan objeknya yaitu persegi empat akan berada dibawah lingkaran. Dengan peralatan yang terdapat di CorelDraw anda bisa merubah urutan objek tersebut sesuai dengan keinginan desain anda. Terdapat beberapa pilihan order, yaitu:
- Tofront : Menjadikan objek aktif berada di posisi paling atas.
- To Back : Menjadikan objek aktif berada di posisi paling bawah.
- Forward One : menaikan urutan objek satu tingkat.
- Back One : menurunkan urutan objek satu tingkat.
CorelDraw Dasar Bagian 6
ALIGN AND DISTRIBUTE
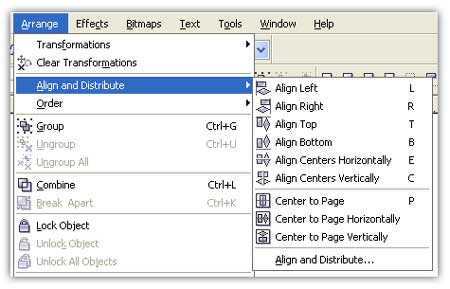
Alat ini berfungsi untuk mengatur perataan beberapa objek sekaligus. Dengan cara memilih menu Arange – Align and Distribute. Akan ada beberapa opsi perataan objek, yaitu :
Advertisement
CorelDraw Dasar Bagian 6
- Align Left : rata kiri
- Align Right : rata kanan
- Align Top : rata atas
- Align Bottom : rata bawah
- Align Centers Horizontally : rata tengah secara horizontal
- Align Centers Vertically : rata tengah secara vertical
- Center To Page : rata di tengah kertas
- Center To Page Horizontally : rata di tengah kertas secara horizontal
- Center To Page Vertically : rata di tengah secara vertical
- Align and Distribute : untuk memunculkan kota dialog align and distribute
CorelDraw Dasar Bagian 6
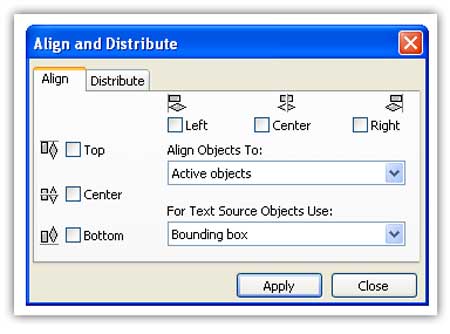
Kemudian pertikan kotak dialog tersebut ada 4 bagian penting.
- Horizontal Alignment, digunakan untuk mengatur pengaturan objek pada sumbe horizontal. Terdapat 3 pilihan pengaturan, yaitu Left (rata kiri), Center (rata tengah) dan Right (rata kanan).
- Vertical Alignment, digunakan untuk menentuakn pengaturan objek pada sumbu vertical. Terdapat 3 opsi, yaitu Top (rata atas), Center (rata tengah) dan Bottom (rata bawah).
- Align Object To, digunakan untuk mengatur patokan yang digunakan dalam pengaturan posisi objek. Terdapat beberapa opsi, yaitu: Active Objects (patokan berdasarkan objek terseleksi), Edge Of Page (patokan berdasarkan pinggiran halaman, Grid (patokan berdasarkan Grid) dan Specified Point (patokan berdasarkan nilai tertentu).
- For Text Source Objects Line, digunakan untuk menentukan posisi khusus untuk objek berupa teks. Terdapat beberapa opsi yaitu: First Line Based (berdasarkan baris pertama baseline teks), Lastline basline (berdasarkan baris terakhir baseline dan Bounding Box (berdasarkan posisi garis terluar taks).
GROUP/UNGROUP
Group berfungsi untuk menyatukan beberapa objek agar tidak terpecah. Caranya adalah memilih menu Arange – Group setelah terlebih dahulu mengaktifkan beberapa objek sekaligus. Apabila anda sudah menyatukan beberapa objek tersebut, maka untuk memisahkannya lagi yaitu dengan cara memilih menu Arange – Ungroup All.
COMBINE/BREAK APPART
Combine berfungsi untuk menyatukan beberapa objek. Caranya adalah memilih menu Arange – Combine. Perbedaannya dengan group yaitu pada group objeknya tidak berubah sebaliknya dengan combine objeknya berubah. Break Appart berfungsi untuk memisahkan objek-objek yang telah di combine. Dengan cara pilih menu Arange – Break curve Appart.
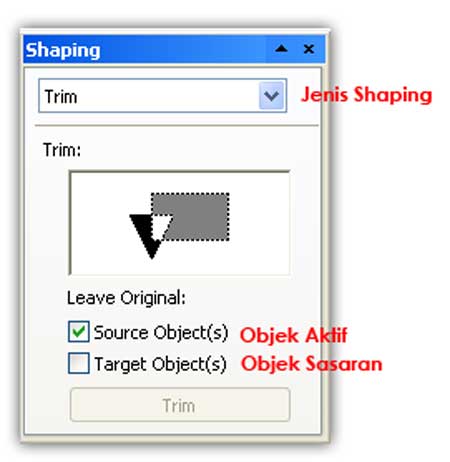
CorelDraw Dasar Bagian 7 – Kali ini saya akan membahas tentang cara menggabungkan beberapa objek. Penggabungan objek juga merupakan salah satu pekerjaan yang biasa dilakukan ketika anda membuat sebuah desain. Cara paling mudah untuk menggabungkan beberapa objek di CorelDraw yaitu dengan cara menggunakan fasilitas Docker Shaping. Anda bisa Memunculkannya dengan cara ke menu Window – Dockers – Shaping. CorelDraw Dasar Bagian 7
Dalam Docker Shaping terdapat 6 opsi penggabungan objek, yaitu :
- Weld, digunakan untuk menggabungkan objek dan objek hasil penggabungan merupakan keseluruhan bentuk objek penyusunannya.
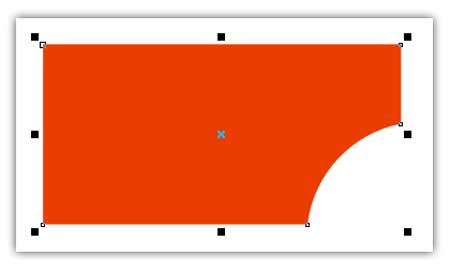
- Trim, digunakan untuk menggabungkan objek dan hasil objek gabungannya merupakan pengurangan bentuk objek target dengan objek source.
- Intersect, digunakan untuk menggabungkan objek dan hasilnya menyisakan porpotongan keduanya.
- Simplify, digunakan menggabungkan objek dan hasilnya bojek source akan terpotong sesuai bentuk source namun objek source itu sendiri tetap ada.
- Front Minus Back, digunakan untuk menggabungkan objek seource dan target. Objek dibagian depan (Front) masih ada namun terpotong oleh objek di belakangnya (back). Back Minus Font, berfungsi untuk menggabungkan objek source dan target. Objek dibagian belakang (back) masih ada namun terpotong oleh objek didepannya (front).
Nah, sekarang mari kita coba menggunakan peralatan shaping.
Advertisement
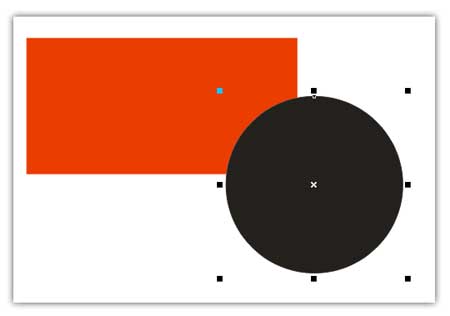
misalkan kita sudah membuat dua buah objek yaitu persegi panjang dan lingkaran. Kemudian anda aktifkan objek lingkaran sebagai source object dan persegi panjang sebagai targetnya.
Lalu tentukan aksi shaping , misalkan Trim. Nah di docker tersebut terlihat ada pilihan Leave Original. Jika anda mengaktifkan leave original itu entah itu source ataupun target bahkan mungkin dua-duanya dengan cara mencentangnya, maka setelah terjadi penggabungan objek yang anda centang tersebut akan tetap utuh setelah terjadi penggabungan. Nah untuk pilihan ini misalnya kita tidak mengaktifkanya dua pilihan tersebut.
CorelDraw Dasar Bagian 7
CorelDraw Dasar Bagian 7
Kemudian dengan pick tool klik tombol Trim di docker shaping, lalu arahkan kursor ke objek target dan klik.
Hasilnya akan tampak seperti ini.
Dengan cara yang kurang lebih sama, anda bisa mencoba jenis shaping yang lainnya. CorelDraw Dasar Bagian 7
CorelDraw Dasar Bagian 8 – Pada tutorial kali ini akan saya bahas tentang Teks, Teks Efek dan Convert To Curve. Bekerja dengan teks dalam pembuatan desain adalah hal yang seing dilakukan dalam CorelDraw. Teks itu sendiri digunakan supaya sebuah desain bisa lebih berfariasi. Sedangkan tool yang dipakai adalah Text Tool. Untuk cara-caranya yaitu sebagai berikut : - Klik Text Tool di toolbox
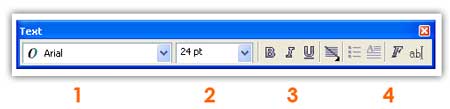
- Sekarang perhatikan Option Tool
CorelDraw Dasar Bagian 8
1. Jenis huruf yang digunakan
2. Ukuran huruf
3. Style Teks
4. Perataan Teks
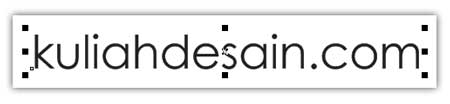
- Klik satu kali pada kanvas, lalu ketikan teksnya
- Mengakhiri pengetikan dengan cara klik Pick Tool di toolbox
Fit Text To Path
Digunakan untuk meletakan teks yang telah anda buat mengikuti alur suatu garis ataupun mengikuti format ouline suatu objek gambar, misalnya lingkaran, segi tiga dan sebagainya. Cara-caranya adalah sebagai berikut :
Klik Text Tool di toolbox, kemudian klik pada kanvas lalu ketikan teksnya
Advertisement
Buat sebuah objek, misalkan sebuah lingkaran. Kemudian aktifkan objek lingkaran dengan teks tersebut.
Pilih menu Text – Fit Text to Path
CorelDraw Dasar Bagian 8
Hasilnya akan tampak seperti gambar berikut ini
CorelDraw Dasar Bagian 8
Memisahkan Teks
Ada kalanya teks yang telah anda buat harus kita pisahkan. Hal ini dapat dikerjakan melalui memilih menu Arange – Break Artistic Text. Menu ini biasa digunakan untuk memisah kalimat menjadi perkata dan kata menjadi perhuruf.
Convert To Curve
Peralan ini berfungsi untuk mengubah teks menjadi kurva. Hal ini dikerjakan untuk mengantisipasi perubahan huruf apabila anda menggunakan dua buah komputer yang berbeda. Misalkan anda membuat teks di komputer A dengan menggunakan Font GOTHIC terus anda simpan di flsh disk, Teks tersebut kemudian anda rubah di komputer B yang tidak ada jenis Font GOTHIC. Hal seperti ini mengakibatkan teks tersebut akan berubah jenis hurufnya. Untuk menanggulangi hal ini, anda bisa merubah huruf atau font tersebut menjadi kurva melalui memilih menu Arange – Convert To Curves sebelumnya terlebih dahulu aktif di teks yang akan anda convert.
CorelDraw Dasar Bagian 9 – Pada tutorial kali ini akan saya bahas tentang merubah objek dengan cara menggunakan Interactive Tool. Efek – efek di CorelDraw ini digunakan untuk merubah suatu objek menjadi bentuk yang lebih unik, dinamis dan menarik. Karena berbasis vektor sehingga efeknya berkualitas tinggi serta tajam. Untuk berimprovisasi dengan efek vektor ini menggunakan Interactive Tool. CorelDraw Dasar Bagian 9
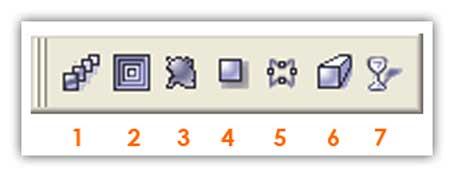
- Interactive Blending Tool, berfungsi untuk memberikan efek perubahan sesuai keinginan anda.
- Interactive Contour Tool, efek ini hampir mirip dengan blending, hanya lebih berguna jika digunakan untuk meberikan efek pada teks, efek berpendar atau efek double outline. Disamping itu, anda juga bisa memisah contour dari objek asal dengan memilih menu Arange – Brak Contour Group Appart.
- Interactive Distortion Tool, berfungsi untuk membuat bayangan dari suatu objek.
- Interactive Shadow Tool, berfungsi untuk membuat bayangan dari suatu objek.
- Interactive Envelope Tool, efek ini berfungsi untuk melakukan perubahan bentuk terhadap sebuah objek atau group objek.
- Interactive Extrude Tool, efek ini berfungsi untuk membuat efek tiga dimensi pada suatu objek.
- Interactive Tranparency Tool, efek ini berfungsi untuk membuat transparan sebuah objek. Dalam hal ini anda bisa memilih bagian apa saja dari objek yang akan dibuat transparan. Misalkan cuma outline atau fillnya saja yang dibuat transparan atau bahkan semuanya dibuat transparan juga bisa.
CorelDraw Dasar Bagian 10 – Pada tutorial kali ini akan saya bahas tentang
Import/Exportyaitu membuka gambar berbasis pixel dan menyimpan desain untuk anda buka pada software berbasis bitmap (Adobe Photoshop).
IMPORT GAMBAR
Adakalanya anda membutuhkan sebuah gambar agar desain yang anda bikin lebih nyata. Di CorelDRAW anda dapat membuat hal itu. Anda dapat membuka sebuah gambar bitmap melalui mengimpornya. Yaitu dengan cara-caranya sebagai berikut :
Pilih menu
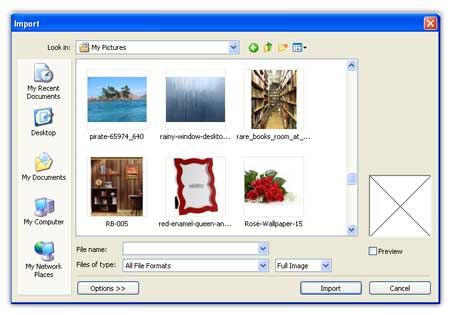
File – Import sehingga tampak kotak dialog
Advertisement
CorelDraw Dasar Bagian 10
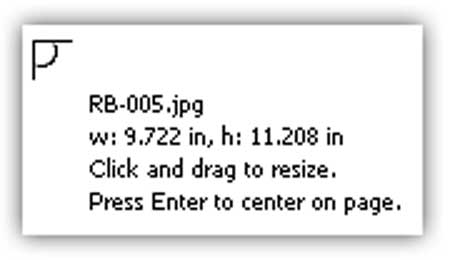
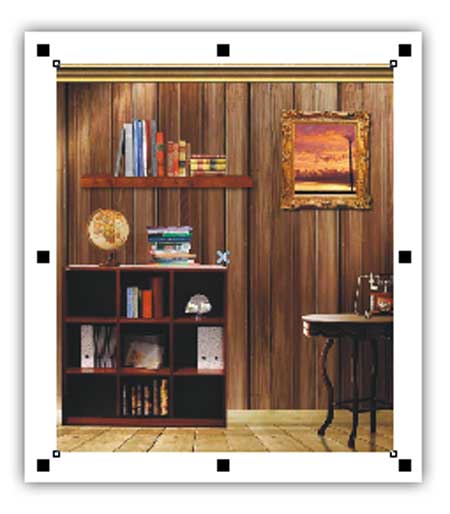
Kemudian pilih salah satu gambar, lalu klik tombolImport sehingga kursor berubah seperti gambar di bawah ini. Kemudian anda dapat membuka gambar tersebut di kanvas melalui cara klik dan drag atau bisa juga Left click. CorelDraw Dasar Bagian 10
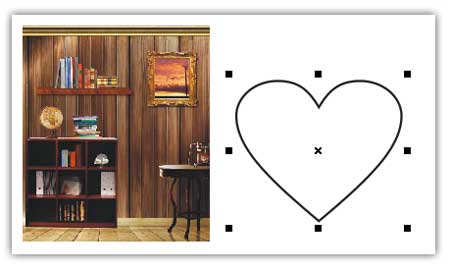
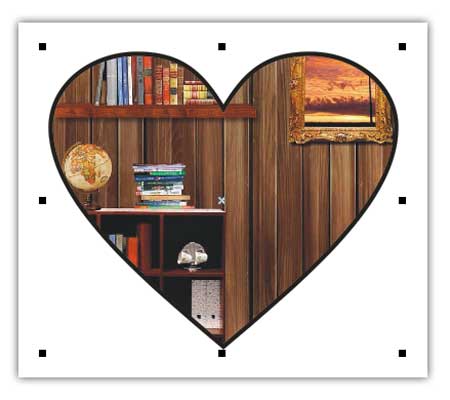
Selanjutnya anda dapat menggunakan teknik Powerclip agar gambar itu berkesan lebih hidup, dengan langkah-langkah sebagai berikut :
CorelDraw Dasar Bagian 10
Buat sebuat objek di atas ibage tersebut, misalkan sebukan objek hati. selanjutnya pastikan aktif di objek gambar, sementara objek hati tidak aktif.
Pilih menu Effect – Powerclips – Place Inside Container sehingga cursor tampak seperti gambar dibawah ini.
CorelDraw Dasar Bagian 10
Pastikan mata panah menempel pada gambar hati kemudian lakukan klik kiri satu kali. Lalu lakukan improvisasi dengan cara menambahkan gambar-gambar yang lain. EXPORT
Kadangkala kitika anda membuat sebuah desain tidak cukup hanya mengguanan satu software saja. Untuk mengoptimalkan hasil anda dibutuhkan menggunakan paling tidak dua software desain yaitu basik vektor dan bitmap. Sebagai contoh, pertama kali anda membuat sebuah desain di coreldraw selanjutnya desain itu disimpan untuk dibuka dan anda edit di photoshop. Nah, desain yang anda buat di corel itu harus di simpan ke format bitmap. Caranya yaitu dengan memilih menu File – Export. Setalah keluar kotak dialog Export, silahkan anda beri nama fil dan mormatnya, lalu klik tombol Export.
CorelDraw Dasar Bagian 10
Selanjutnya, muncul kotak dialog Convert To Bitmap. Atur ukuran gambar, resolusi gambar dan mode warna selanjutnka klik ok. akan muncul lagi sebuah kotak dialog kemudian klik ok.
Kemudian sesudah melawati langkah diatas, berarti proses ekspor anda telah selesai, dan anda tinggal membuka file gambar tersebut di photoshop.
Demikian informasi CorelDraw Dasar Bagian 10, semoga informasi bermanfaat untuk anda. Jika ada pertanyaan mengenai Tutorial CorelDraw di atas, anda bisa hubungi kami di menu contact di web ini. Terimakasih anda telah mengunjungi kuliah desain dan membaca informasi mengenai.
CorelDraw Dasar Bagian 10
Membuat Kartu Mahasiswa Beserta Fotonya Otomatis Bagian 2
Tutorial Membuat ID Card Otomasi dari Database Excel Bagian 1 kali ini lanjutannya mengenai cara memasukan fotonya secara sekaligus, bayangkan anda punya banyak foto ID Card yang hendak anda buat, harus anda copy satu persatu, sesuaikan ukurannya dan atur posisinya, sungguh melelahkan untuk pekerjaan yang sangat banyak seperti itu. Tenang, Programing Is Logic, Design Is Creative & CorelDraw Is Magic.
Di CorelDraw saya bisa melakukan kreatifitas juga bisa melakukan pemrograman dengan VBA sehingga mengasah logika saya, berikut ini saya berikan tutorialnya dari hasil macro fotoIDCard Otomatis.
Pada tutorial ini saya asumsikan file lokasi projek di
- Lokasi Utama : D:\ID_Card\
- Lokasi Foto : D:\ID_Card\Foto\
- Setelah semua format ID Card, terbentuk di CorelDraw dari hasil Merge to New Document seperti pada tutorial bagian 1.
- Selanjutnya adalah buat kotak foto dengan Rectangle Tool atau objek lain sesuka hati anda yang akan otomatis di tambahkan menggunakan Macro nantinya.
- Sebelum menggunakan macro catat dulu kira-kira jarak antara tengah foto ke kanan dan ke bawahnya berapa jauh. Misalkan jarak X 98 mm dan jarak Y 58 mm
- Setelah jarak antar foto anda ketahui, selanjutnya cukup sisakan 1 kotak foto saja di bagian ID Card Pojok Kiri Atas yang lainnya hapus.
- Selanjutnya sebelum menjalankan Macro atur Nama Foto dengan Format (0).jpg sampai (xxxx).jpg jumlah yang anda inginkan. Berikut Triknya (Dalam hal ini urutan foto sudah saya sesuaikan dengan urutan nama-nama di Kartu nama CorelDraw):
- Seleksi semua Foto, Klik Kanan pada foto paling pertama, kemudian pilih Rename lalu ketik (0).jpg, maka otomatis foto yang lainnya otomatis berubah namanya di tambah 1 dari (0).jpg jadi (1).jpg dan seterusnya.
- Selanjutnya kembali ke CorelDraw anda dan Klik pada Objek tempat Foto jalankan Macro FotoIDCard Otomatis saya lebih suka melalui Macro Manager untuk CorelDraw X5 ke Atas, atau Melalui Menu Tools, - Macro - Run Macro untuk semua versi CorelDraw.
- Ketika tampil jendela Macro IDCard Otomatis silahkan atur pada bagian kotak kanan dan sesuaikan seperti pada langkah 3 di atas jaraknya,
- Klik Buat maka otomatis semua foto masuk ke CorelDraw Anda.
Cara Membuat Desain Kartu Nama Dengan CorelDraw X4
Hasil Akhir
Berikut langkah-langkahnya;
Langkah 1
Siapkan canvas dengan ukuran 9 x 5 cm.
Langkah 2
Langkah selanjutnya menyiapkan Guidelines(Garis Bantu), aktifkan terlebih dahulu Bleed Area (garis tepi pada canvas) dengan cara mengklik menu View “ Setup => Guidelines Setup “ Presets “ Bleed Area, jangan lupa mengaktifkan Snap To Guidelinespada Property Tool agar objek yang kita buat melekat pada Guidelines.
Langkah 3
Selanjutnya membuat Background kartu nama, caranya, buat objek kotak dengan menggunakan Rectangle Tool (F6)sebesar ukuran canvas. Atur Corner Radius menjadi 0,2 cm agar sudut kotak menjadi lebih halus.
Langkah 4
Beri warna kotak dengan Interactive Tool (G), pilih Fill Type menjadi Radial, pilih warna yang diinginkan, disini saya menggunakan warna biru terang (cyan) dan hijau terang (Ghost green).
Langkah 5
Selanjutnya membuat garis dengan menggunakan Pen Tool, buatlah garis seperti gambar di bawah ini.
Langkah 6
Ubah garis agar melengkung dengan cara Klik Shape Tool, klik kiri di tengah-tengah garis diagonal, kemudian Pilih Convert to Curve.
Langkah 7
Masih dengan menggunakan Shape Tool, klik kiri dan Drag garis kebawah agar melengkung seperti gambar dibawah ini.
Langkah 8
Beri warna Gradient dengan cara Klik Interactive Fill (G), pilih type fill Linier dan pilih warna seperti gambar dibawah.
Langkah 9
Selanjutnya Copy + Pasteobjek garis melengkung tersebut, dan rubah warnanya menjadi putih lalu kecilkan dengan cara klik kiri pada titik acu kiri tengah dan Drag kekanan hingga seperti gambar dibawah.
Langkah 10
Selanjutnya buatlah garis melengkung dibagian kiri bawah, lihat langkah 5 s/d 8. Hasilnya seperti gambar dibawah.
Langkah 11
Langkah selanjutnya membuat tempat Alamat, klik Pen Tool dan buat garis kotak seperti gambar dibawah, beri warna Ice Blue.
Langkah 12
Buat agar kotak Alamat menjadi transparan dengan cara klik Transparency Tool, Pilih Type Linierdan drag dari bawah keatas pada objek kotak.
Langkah 13
Langkah selanjutnya membuat text, dengan menggunakan Text Tool (f8) buat lah text dan posisikan text seperti gambar dibawah;
Langkah 14
Anda juga bisa menambahkan logo yang anda punya di bagian kanan atas. Contohnya seperti gambar dibawah ini.
Oke selesai, dari tutorial ini anda bisa desain kartu nama yang lebih menarik, contohnya seperti dibawah ini;
Membuat desain kartu nama kadang sedikit menyusahkan karena ketidaktahuan teknik buat kartu nama yang baik dan benar. Cara bikin kartu nama dengan CorelDRAWini mungkin menjadi solusi tepat sebagai bahan belajar desain menggunakan CorelDRAWsekaligus Anda akan diajari mulai dari tahap awal langkah demi langkah secara mendetail. Mendesain kartu nama ini mudah untuk dipelajari demikian pula sangat gampang untuk dipraktekkan meskipun Anda adalah seorang pemula yang baru belajar desain CorelDRAW. Ada beberapa tahapan dalam membuat desain kartu nama menggunakan CorelDRAWyang akan dibahasa pada tutorialCorelDRAW ini. Setiap langkah juga akan disertai dengan beberapa uraian singkat untuk menjelaskan apa yang sedang dilakukan. Rekomendasi bacaan terkait :
- Cara Membuat Desain Kartu Nama dengan Illustrator
- Cara Membuat Desain Kartu Nama dengan Photoshop
- Desain Kartu Nama
- Membuat Stempel dengan Coreldraw
- Buat Logo Ubuntu Sendiri dengan Corel Draw
Beberapa orang mungkin akan menganggap tutorial ini biasa saja namun bagi kami tutorial membuat kartu nama dengan CorelDRAWini mempunyai esensi yang penting. Di dalam tutorial CorelDRAW ini kita akan banyak teknik mendesain menggunakan CorelDRAW yang tidak biasa kita sadari atau kita tahu. Sejenak kami berpikir kenapa harus membuat artikel tentang tutorial CorelDRAW membuat desain kartu nama. Mungkin Anda juga akan berpikir demikian. Sebenarnya kami menulis artikel desain grafis ini karena kartu nama merupakan alat yang kuat dan hebat untuk promosi. Tahukah Anda bahwa kartu nama tidaklah diserahkan pada setiap orang secara random. Tidak. Kartu nama hanya diserahkan kepada mereka yang benar-benar berpotensi untuk mennggunakan jasa Anda atau membeli produk dari Anda saja. Dinilai dari tugas besar yang demban oleh kartu nama inilah kami memutuskan untuk membagikan tutorial CorelDRAW membuat desain kartu namaini. Jika Anda adalah seorang pengusahaatau pebisnis yang membutuhkan jasa membuat desain kartu nama unik dan menarik, Anda bisa memesan kepada kami melalui contact. Kami akan sesegera mungkin membuatkan desain kartu nama buat Anda. Tolong bantu kami dalam rangka pembelajaran desain dengan cara menyebarkan artikel yang ada di website ilmu grafisdesain ahlidesain.com ini melalui klik share facebook atau tweet twitter atau google plus Untuk informasi jika Anda tidak tahu atau kesulitan download file dari ziddu silakan baca artikel tips download ziddu disini. Bila ada yang ditanyakan, informasi link download rusak (deleted, link salah), saran, tanggapan dan ide kreatif silakan isi pada komentar, saya akan mencoba menjawab secepat dan sebaik http://www.ahlidesain.com/cara-membuat-desain-kartu-nama-dengan-coreldraw.htmlmungkin.
Macro FIDCO Versi 02 (Foto ID Card Otomatis) di CorelDraw
Setelah di uji coba dan realese versi pertamanya pada
Tutorial Membuat Kartu Mahasiswa Otomatis Beserta Fotonya bagian 2, kini Macronya saya Namai FIDCO (Foto ID Card Otomatis) dan sudah dikembangkan lagi menjadi Versi-02 dan diperbaiki dari Versi Sebelumnya: Berikut Fitur-fitur dan Screenshotnya:
Fitur Terbaru Macro FIDCO versi 02 :
- Best Fitur: Memasukan Foto ID Card Otomatis di CorelDraw
- Mendeteksi Otomatis Lokasi File ID Card CorelDraw Anda,
- Mengatur format Jumlah ID Card ke Kanan dan Ke Bawah (Jumlah ID Card 1 Halaman Kerja)
- Mengatur Format jarak ke kanan dan ke bawah antar foto ID Card, dan Bisa menggunakan koma (,) sehinga lebih presisi
- Ditambahkan Fitur Error Handler sehingga Mencegah Terjadinya Error Saat User salah input di form.
- Preview Foto : untuk menampilkan dan cek foto-foto yang hendak di masukan ke ID Card
Screenshot:
Link Download:
Ade Sanusi
Senin, 01 Desember 2014
Paling asik kan kalo ngerjain sesuatu otomatis? :D, gak perlu repot-repot manual, untung di CorelDraw terintegrasi VBA jadi bisa mempelajarinya dan mengembangkan macro kreasi sendiri. Sebelum ke yang otomatis kita lanjut dulu ke yang semi, berikut ini tutorial cara mebuat/memasukan data Id Card, Kartu Karyawan, Kartu Mahasiswa, Kartu pelajar dan lainnya otomatis ke CorelDraw dengan bantuan Mail Merge, seperti yang pernah saya bahas di Tutorial Print Merge Cetak banyak Label Otomatis Sekaligus dari data Excel. Untuk tutorial membuat ID Cardnya mungkin lain kali saya bahas lebih detail, di sini saya fokuskan penggunaan data ID Card dari Excel. Disarankan file CorelDraw, Excel dan Fotonya dibuat satu folder khusus sehingga lebih mudah pengerjaanya. (Contoh : D:\ID_Card\ )
- Buatlah format ID Card, misalkan 90 mm x 55 mm di Kertas A4, dengan pembagian simetris sehingga dihasilkan 10 ID Card.
- Setelah membuat format CorelDrawnya, silahkan buat format Excelnya disesuaikan dengan jumlah field yang diinginkan, Misalkan : Nim1 s.d Nim10, Nama1 s.d Nama10, TTL1 s.d TTL10, Jurusan1 s.d Jurusan10, kemudian isi masing-masing field ke kanan, lanjut ke bawah.
- Biasanya format data excel dari customer formatnya ke bawah, cara mudahnya adalah seleksi misalkan pada baris nama ke 1 hingga nama ke 10, kemudian paste special pilih Transpose di rows A2 file csv-nya. Lanjut seleksi nama ke 11 s.d 20 kemudian paste special pilih Transpose di rows A3 file csv-nya dan seterusnya.
- Masih di Excel silahkan masukan semua data sesuai jumlah yang diinginkan, kemudian klik File-Save As pada bagian name misalkan : id_card dan pada bagian Save As Type pilih CSV (Comma delimited)(*.csv)
- Kemudian klik tombol Save jika ada pesan tampil pilih Yes saja kemudian tutup File Excel tersebut supaya tidak terjadi error saat penggunaan data di CorelDraw
- Kembali ke CorelDraw seperti pada tampilan gambar nomor 1 kemudian
- Klik Menu File -> Print Merge -> Create/load Print Merge
- Pilih import text form a file or an ODBC data source kemudian klik tombol Next
- Buka file CSV yang telah di simpan pada langkah 2 ( D:\ID_Card\id_card.csv )
- Klik Next-Next saja sampai tampil gambar berikut:
- Kemudian klik Tombol Finish:
- Masukan Field field yang ada dan atur posisinya, ukuran font dan perataannya, (Sarannya masukan saja dulu semuanya di 1 tempat kemudian seleksi semua atur ukuran font, jenis huruf, dan perataanya misalkan rata kiri setelah itu baru atur per masing-masing ID Card sampai 10 ID Card terpenuhi field)
- Setelah semuanya anda atur selanjutnya klik tombol Perform Print Merge jika ingin mencetaknya tanpa foto dan Merge to New Document untuk menjadikan file tersendiri sehingga bisa anda masukan foto di dalamnya.
- Saya sarankan supaya pada saat anda Merge to New Document tidak hank karena proses pembacaan data field yang banyak sebaiknya format id cardnya di cut dulu dan pindahkan ke file baru untuk sementara, dan saat sudah jadi file mergenya baru masukan ke bagian Master Page (All Pages)
- Demikian tutorial memasukan data ID Card dari Excel ke CorelDraw secara Otomatis.